Introduction
Continuous integration/Continuous deployment is a widely adopted practice in modern-day software development.
CI (Continuous integration) is a development practice where developers integrate code into a shared repository frequently, as a result, each integration can then be verified by an automated build and automated tests.
CD in CI/CD refers to continuous delivery and/or continuous deployment, which are related concepts that sometimes get used interchangeably.
Continuous delivery usually means a developer’s changes to an application are automatically tested and uploaded to a repository (like GitHub or a container registry). Thus, you will have a deployment-ready build that can be deployed to production at any point in time.
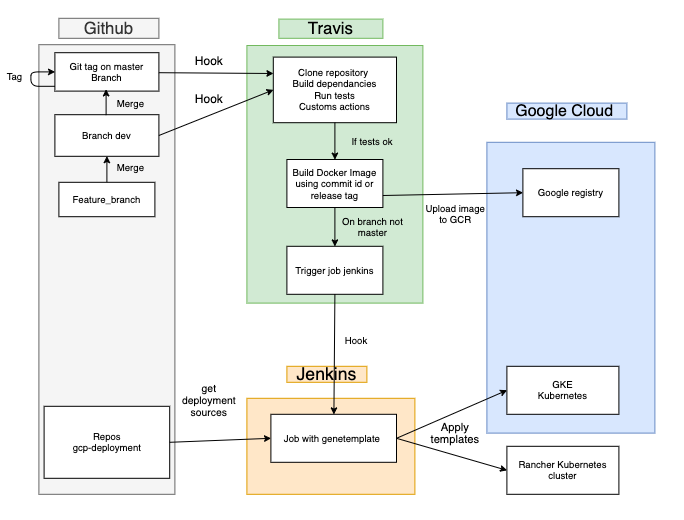
Continuous deployment goes one step further than continuous delivery. Generally speaking with this practice, the build will be deployed automatically. There’s no human intervention, and only a failed test will prevent a new change to be deployed to production. At Sendinblue, we use CI/CD tools like Travis CI and Jenkins for seamless deployments on a variety of platforms like GKE (Google Kubernetes Engine) and Rancher. We use Travis CI to also run unit tests and linting for every Pull Request and branch push. Here is an overview of our CI/CD pipeline.

Let’s try to understand some of these concepts in this post through an example.
About this post
In this post, we will focus on the CD part. We will create a simple Express application and build a pipeline that deploys it to Google Kubernetes Engine (GKE) whenever any changes are pushed to the master branch. GKE is a managed service in GCP to run our docker containers. We will use Travis CI to create this pipeline. Let’s get started.
Prerequisites
- Create an account on Google cloud if you don’t have it.
- Download and install the Google Cloud SDK
- Install kubectl (CLI for running Kubernetes commands) by running the command
gcloud components install kubectl - Create a project in GCP
- Download and install Docker.
- Run the command
gcloud initin your terminal and follow the instructions.
Deploy the app using gcloud CLI
- First of all, we will create a simple project using express. Here is the server file. We have just created an HTTP server using Express with a GET and a POST endpoint.
const express = require('express');
const app = express();

app.get('/ping', function(req, res) {
	return res.status(200).send({message: 'up and running'});
})

app.post('/test', function(req, res) {
	return res.status(200).send({message: 'ok'});
})

const port = process.env.PORT || 8080;

module.exports = app.listen(port, function() {
	console.log("app listening on 8080")
});- Now, let’s create a docker image of this application. Create a file with the name Dockerfile at the root of the project. This file contains the steps to package our app as a docker image.
# Use node:12-slim as the base image
FROM node:12-slim

# Set working dir in the container to /app. We shall use this directory to store files, run npm, and launch our application.
WORKDIR /app

# First copy package.json to /app directory and run npm install. By copying the package.json separately, Docker will install the dependencies again only if you change the package.json file. This results from the way the Docker image is being built (layers and cache).
COPY package.json /app
RUN npm install

# copy the app to workig dir.
COPY . /app

# Expose port 8080 to the outside once the container has launched:
EXPOSE 8080

# This line describes what should be executed when the Docker image is launching.
CMD ["node", "server.js"]
Building a docker image
- Build a docker image for the app by running the command.
docker build -t k8s-cd-demo
Now we will push the above image to the Google container registry.
First, tag the above image using the following command. Here, v1 is the image tag.docker tag k8s-cd-demo gcr.io/{PROJECT_ID}/k8s-cd-demo:v1
Then push the image to GCR by runninggcloud docker — push gcr.io/${PROJECT_ID}/k8s-cd-demo:v1 - Create a cluster in GKE to which we will deploy our application/image.
Run the below command to create a cluster named k8s-cluster.gcloud container clusters create k8s-cluster --zone us-east1-b - Connect kubectl client to our cluster by running
gcloud container clusters get-credentials k8s-cluster --zone us-east1-b - Now we will create a deployment spec file. A deployment is a Kubernetes resource that lets us manage a set of identical pods. With a deployment, we tell Kubernetes how many copies of a pod we want running. It can also contain information like auto-scaling criteria but we will not cover it here.
- Besides a deployment, we will also create a service. Why?
A service is an abstract way to expose an application running on a set of pods to the outside world. Kubernetes pods are mortal. By using a deployment to run your app, it will create and destroy Pods dynamically. Each Pod gets its own IP address, however, in a Deployment, the set of Pods running in one moment in time could be different from the set of Pods running that application a moment later. However, services have their own IP addresses which are relatively stable; thus, a request from an external resource is made to a service rather than a pod, and the service then dispatches the request to an available pod.
We have defined both deployment and service in a single file. They can be defined in separate files also.
apiVersion: "apps/v1"
kind: "Deployment"
metadata:
  name: "k8s-cd-demo"
  namespace: "default"
  labels:
    app: "k8s-cd-demo"
spec:
  replicas: 2
  selector:
    matchLabels:
      app: "k8s-cd-demo"
  template:
    metadata:
      labels:
        app: "k8s-cd-demo"
    spec:
      containers:
      - name: "k8s-cd-demo"
        image: "gcr.io/project_id/k8s-cd-demo:v1"
---
# A load balancer is type of service which will expose an IP and route the requests to this IP to the internal pods.
apiVersion: v1
kind: Service
metadata:
  name: k8s-cd-demo
spec:
  type: LoadBalancer
  ports:
    - port: 8080
      targetPort: 8080
  selector:
    app: k8s-cd-demo
Deploy your service
- Now we’re ready to go. Go to your project root and run the command
kubectl apply -f app.yaml. This will create the deployment with the specified number of pods and also will create a service to provide external access to the pods. You can view your pods by runningkubectl get pods
Run the commandkubectl get servicesand you should see a similar output.
| NAME | TYPE | CLUSTER-IP | EXTERNAL-IP |
| k8s-cd-demo | LoadBalancer | 10.30.50.70 | 30.180.240.320 |
| kubernetes | ClusterIP | 10.20.30.40 | <none> |
- Go to the External-IP of the load balancer. Hit http://external-ip:port/ping in your browser and you will see the response
up and running.
Yay! we have successfully deployed our app to GKE. You can also view your pods in the Google cloud console

Quick Recap
We know how to deploy a Node.js application to GKE. We know the steps, now we need to find a way to trigger these steps automatically when we commit our changes to our production branch.
Enter Travis!
Travis CI is a hosted continuous integration service used to build and test software projects. Since it is a managed service, you do not have to manage your own infrastructure. It integrates very well with Github.
Travis Setup
- Go to travis-ci.org and signup with Github.
- After you sign in, click on your profile picture in the top right of your Travis Dashboard, click Settings and then select the repositories you want to use with Travis CI from the list.
Deployment using Travis CI
Create a file named .travis.yml at the root of your project. This file tells Travis what to do. When we push any changes to our repository, Travis CI will run a build with the steps mentioned in this file.
Let’s see what this file looks like
# specify the language used
language: node_js

# list any node_js version you want to test against
node_js:
  - "12.13.1"

# Install services
services:
  - docker

# Run your tests or check for linting errors.
script:
  - echo "run tests if any"

deploy:
  - provider: script
    script: travis/deploy.sh
    on:
      branch: master
In this file, we tell Travis the language used in our app with the version.
Under services, we have docker because we will be using docker to create our build.
In the script step, you can specify commands to run your tests (eg: npm test). If any of your tests fail, the build will stop and thereupon will see that the build has errored.
After the script step is successful, we will move to the deploy step.
In the deploy step, we basically tell Travis to execute a script present on the path Travis/deploy.sh when a new commit is pushed to the master branch.
Here is what our deploy script looks like
#!/usr/bin/env bash
set -ex

if [ -z "$TRAVIS" ]; then
	echo "This script must be executed from Travis only !"
	exit 1
fi

curl https://sdk.cloud.google.com | bash -s -- --disable-prompts > /dev/null
export PATH=${HOME}/google-cloud-sdk/bin:${PATH}
gcloud --quiet components install kubectl

echo ${GCLOUD_SERVICE_KEY} | base64 --decode -i > ${HOME}/gcloud-service-key.json
gcloud auth activate-service-account --key-file ${HOME}/gcloud-service-key.json

gcloud --quiet config set project ${PROJECT_ID}
gcloud --quiet config set container/cluster ${CLUSTER_NAME}
gcloud --quiet config set compute/zone ${CLOUDSDK_COMPUTE_ZONE}
gcloud --quiet container clusters get-credentials ${CLUSTER_NAME}

docker build -t ${APP_NAME} .
docker tag ${APP_NAME} gcr.io/${PROJECT_ID}/${APP_NAME}:${TRAVIS_COMMIT}
gcloud docker -- push gcr.io/${PROJECT_ID}/${APP_NAME}:${TRAVIS_COMMIT}

kubectl set image deployment/${DEPLOYMENT_NAME} ${CONTAINER_NAME}=gcr.io/${PROJECT_ID}/${APP_NAME}:${TRAVIS_COMMIT}
It basically contains the commands we used earlier to deploy to GKE with a couple of differences.
Let’s take it step by step
- Line 9–12: We install google cloud SDK and kubectl.
- Generating Service Account Key: We need to login to google cloud but since we are running an automated script, we will have to use a service account key which will help us authenticate. Follow these steps to create one.
While creating a key, make sure that you enable the roleStorage AdminandKubernetes developerto be able to push the docker image to GCR. - Storing Service Account Key in Travis: Once we have the key from the above step.
Go to your Travis account, select the repository in my repositories and click More options -> Settings.
Next, Go to Environment variables and set your key as a variable.
First, we convert our service account key (which is a JSON file) to a base64 string.
Then, we assign it to a variable GCLOUD_SERVICE_KEY. Along with the key, we keep the entities like CLUSTER_NAME, PROJECT_NAME, etc as an env variable.
These variables can be accessed in our script by${VARIABLE_NAME}.

- Line 13–14: The command on line 13 decodes this base64 string and stores it in a JSON file named gcloud-service-key.json.
Next, we take this JSON file and use it in the commandgcloud auth activate-service-accountfor authentication. - Line 16–19: We set the project-id, cluster, and compute zone and then connect kubectl client to our cluster, just like we did before.
The — quiet flag is to ignore any prompts in b/w commands and proceed with the default values. - Line 21–23: we build a docker image of our app and push it to GCR just like we did earlier. The variable $TRAVIS_COMMIT refers to the commit id. We use this commit id for the image tag.
- Line 25: We use the command
kubectl set image deployment. This command updates the image in our k8’s deployment. - You can also use
kubectl applycommand if that fits your needs
Pipeline set up successful
We have successfully set up our pipeline. Now, whenever you commit any changes in the master branch, Travis will run the deploy script which will update the image running in our Kubernetes pods.
You can view the status of your current build and also your previous build in build history in your Travis CI account.

By clicking on any build, you can view the job log. This can therefore help you debug the issues for any unsuccessful build.
Conclusion
Setting up a CI/CD pipeline allows new features to be tested, deployed, and delivered to your customers much more quickly. Which in turn saves you a lot of time you spend doing repetitive tasks. In conclusion, we used Travis CI to automate our deployment but you can apply these concepts in your infrastructure.